The Kawasaki Mule is a reliable workhorse, but like any vehicle, it can experience issues. Common problems include the DFI light, throttle body buildup, and fuel system faults. This guide helps owners diagnose and fix these issues efficiently, ensuring optimal performance and longevity. Regular maintenance and the right tools are key to troubleshooting successfully.
Overview of Common Issues
Kawasaki Mule owners often encounter a range of issues that can hinder performance and reliability. Common problems include the DFI light illumination, throttle body buildup, and fuel system faults. Engine starting difficulties, transmission slipping, and overheating are also frequently reported. Additionally, carburetor issues, such as float bowl flooding, can cause stalling and rough running. Electrical system faults, including sensor malfunctions, often trigger warning lights and disrupt operation. Transmission problems, like delayed engagement, and drivetrain noise further complicate troubleshooting. Regular maintenance can prevent many of these issues, but when they arise, a systematic approach is essential for effective resolution. Understanding these common problems is the first step toward keeping your Kawasaki Mule in optimal condition.
Importance of Regular Maintenance
Regular maintenance is crucial for ensuring the Kawasaki Mule operates efficiently and reliably. Neglecting routine checks can lead to premature wear, costly repairs, and even safety hazards. By staying on top of maintenance, owners can identify and address potential issues before they escalate. This includes cleaning or replacing air filters, checking oil levels, and inspecting the throttle body for buildup. Proper upkeep also extends the lifespan of critical components like the fuel system, coolant lines, and electrical sensors. A well-maintained Mule performs better, experiences fewer breakdowns, and retains its value over time. Consistency in maintenance routines is key to maximizing performance and minimizing downtime.
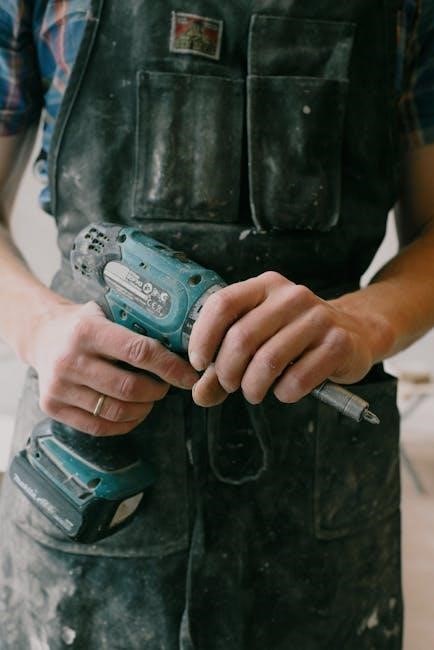
Essential Tools for Troubleshooting
Having the right tools is crucial for effective Kawasaki Mule troubleshooting. A multimeter is essential for diagnosing electrical issues, while a throttle body cleaning kit helps address DFI light problems. A fuel pressure test kit is vital for identifying fuel system faults, and a scan tool can retrieve error codes for sensor-related issues. Basic tools like screwdrivers, pliers, and wrenches are indispensable for general repairs. Additionally, a compression test kit can help identify engine misfires, and a coolant pressure test kit is useful for overheating problems. Keeping these tools on hand ensures you can quickly diagnose and resolve common issues, saving time and money. Regularly updating your toolkit is key to staying prepared for any situation.
Engine Issues
Common engine problems include hard starting, misfires, and stalling. Issues often stem from throttle body buildup, sensor faults, or carburetor float bowl flooding. Regular maintenance is crucial.
DFI light and ignition system faults can cause rough running. Addressing these promptly prevents further damage and ensures reliable performance.
Hard Starting or No Start Conditions
Hard starting or no start conditions in the Kawasaki Mule can be frustrating and often stem from fuel system issues. A faulty fuel pump, clogged fuel filters, or empty fuel lines are common culprits. Ignition problems, such as a bad spark plug or faulty ignition coil, can also prevent the engine from starting. Additionally, a malfunctioning throttle position sensor or crankshaft position sensor may disrupt the engine’s ability to start. It’s important to check the fuel system for blockages and ensure the battery is fully charged. Using a multimeter to test electrical connections and sensors can help pinpoint the root cause. Addressing these issues promptly ensures reliable performance and prevents further complications.
Engine Misfires and Rough Running
Engine misfires and rough running in the Kawasaki Mule can significantly impair performance. These issues often stem from throttle body buildup or faulty sensors, which disrupt proper engine operation. Symptoms may include the DFI light illuminating, sputtering, or uneven idle. To address this, inspect and clean the throttle body, ensuring no debris obstructs airflow. Additionally, check sensors for any faults or connections for looseness. Addressing these problems promptly can restore smooth engine function and prevent further complications, ensuring the Mule operates efficiently and reliably under various conditions.
Stalling Issues and Idle Problems
Stalling and idle problems are common in Kawasaki Mule models, particularly those with carburetors. These issues often occur when the throttle is released or during low-speed operation. Causes include carburetor float bowl flooding, clogged air filters, or faulty idle mixture adjustments. Symptoms may also stem from fuel system issues, such as a clogged fuel filter or failing fuel pump. Ignition system faults, like worn spark plugs or cracked ignition coils, can exacerbate stalling. Addressing these problems involves cleaning or replacing the carburetor, inspecting the fuel system, and ensuring proper ignition performance. Regular maintenance, such as air filter cleaning and spark plug replacement, can prevent these issues. Prompt attention is crucial to avoid further complications and ensure smooth operation.
Overheating and Coolant-Related Problems
Overheating is a common issue in Kawasaki Mules, often caused by low coolant levels, radiator blockages, or faulty thermostats. Symptoms include a rising temperature gauge, engine overheating light, or even engine damage if left unchecked. Regular coolant checks and flushes can prevent these problems. Inspect the radiator for debris or corrosion, and ensure the coolant-to-water ratio is correct. A malfunctioning water pump or cracked hoses can also lead to overheating. Addressing these issues promptly is crucial to avoid costly repairs. Always refer to the Kawasaki Mule service manual for specific guidance on coolant system maintenance and repairs.
Electrical and Sensor Issues
DFI light illumination and throttle body buildup are common electrical issues. Sensor faults, such as oxygen or crankshaft sensors, can trigger error codes and affect engine performance.
DFI Light and Throttle Body Problems
The DFI (Digital Fuel Injection) light is a common issue in Kawasaki Mules, often indicating problems with the throttle body or fuel system. Buildup on the throttle body can cause poor engine performance, triggering the DFI light. Sensors faults, such as those in the throttle position sensor or oxygen sensor, may also illuminate the light. Symptoms include rough running, stalling, or hesitation during acceleration. Cleaning the throttle body and checking sensor connections are essential first steps. If the issue persists, consulting a professional or referring to a repair manual is recommended. Addressing these problems promptly prevents further damage and ensures reliable operation of your Kawasaki Mule.
Sensor Faults and Error Codes
Sensor faults are common in the Kawasaki Mule, often triggering error codes like the DFI light. These issues can stem from faulty oxygen sensors, crankshaft position sensors, or throttle position sensors; Symptoms include poor engine performance, stalling, or warning lights. Diagnosing requires a code reader to identify specific error codes. Cleaning or replacing faulty sensors and checking wiring connections can resolve many problems. Regular inspection of sensor components ensures reliable operation and prevents unexpected issues. Addressing sensor faults promptly is crucial to maintain engine efficiency and avoid further damage. Always consult a repair manual for precise troubleshooting steps tailored to your Mule model.
Electrical System Diagnostics
Diagnosing electrical issues in the Kawasaki Mule requires a systematic approach. Start by inspecting wiring and connections for damage, corrosion, or loose terminals. Use a multimeter to test voltage and continuity in critical circuits. Faulty fuses or relays can often cause intermittent problems, so check these first. If the battery is weak or not holding a charge, it may trigger electrical system malfunctions. Additionally, ensure the alternator is functioning properly to maintain the battery’s charge. Consult a wiring diagram to trace circuits and identify potential short circuits or open connections. Addressing electrical issues promptly prevents further damage and ensures reliable operation of the vehicle’s systems.
Transmission and Drivetrain Problems
Transmission slipping, delayed engagement, and drivetrain noise are common issues that can hinder performance. Understanding these problems is crucial for maintaining your Kawasaki Mule’s reliability and productivity.
Transmission Slipping or Delayed Engagement
Transmission slipping or delayed engagement in the Kawasaki Mule can disrupt operation and productivity. Common causes include low or dirty transmission fluid, worn clutch packs, or faulty solenoids. Delayed engagement may stem from sensor malfunctions or misaligned throttle components. Checking fluid levels and condition is a first step. Inspecting for worn belts or torque converter issues is also crucial. Replacing damaged components and ensuring proper adjustments can resolve these problems. Regular maintenance, such as fluid changes and filter inspections, helps prevent transmission issues. Addressing these problems promptly ensures smooth operation and extends the vehicle’s lifespan. Always consult a professional if DIY troubleshooting doesn’t resolve the issue.
Drivetrain Noise and Vibration
Drivetrain noise and vibration are common issues in Kawasaki Mules, often caused by worn universal joints or damaged CV axles. These problems can manifest as clunking sounds during acceleration or constant vibrations while driving. Over time, excessive wear on these components can lead to complete failure, leaving the vehicle inoperable. Regular inspection of the drivetrain is crucial to identify early signs of wear, such as play in the joints or visible damage. Replacing faulty parts promptly can prevent further damage and ensure smooth operation. Addressing these issues early is essential to maintain the vehicle’s reliability and performance, especially in demanding work environments.
Difficulty Shifting Gears
Difficulty shifting gears in the Kawasaki Mule can stem from several factors, including low transmission fluid levels, dirty or degraded fluid, or worn clutch packs. Additionally, misaligned or damaged gear linkages can hinder smooth shifting. In some cases, sensor malfunctions or electrical issues may disrupt gear engagement. To address this, check the transmission fluid level and condition, ensuring it meets the manufacturer’s specifications. Inspect the gear linkage for any signs of damage or misalignment. If issues persist, consider replacing worn components or consulting a professional mechanic. Regular maintenance, such as fluid changes and component inspections, can prevent these problems and ensure smooth operation.
Fuel System Troubleshooting
Fuel system issues often stem from faulty pumps, clogged filters, or carburetor problems. Addressing these promptly prevents poor performance and potential engine damage.
Fuel Pump Failure and Clogged Filters
Fuel pump failure and clogged filters are common issues in Kawasaki Mule vehicles, often leading to poor engine performance. Symptoms include difficulty starting the engine, sputtering, or complete stalling. These problems frequently arise from dirt, debris, or old fuel clogging the filter or pump. Over time, neglecting regular maintenance can exacerbate these issues, causing costly repairs. To address this, inspect and replace the fuel filter regularly, and ensure the fuel tank is kept clean. If the fuel pump fails, it may need to be replaced entirely. Early detection and prompt action can prevent further damage to the engine and fuel system, ensuring reliable operation. Always use genuine Kawasaki parts for optimal performance. Regular checks can help avoid these issues altogether.
Carburetor Issues and Float Bowl Problems
Carburetor issues are common in older Kawasaki Mule models, often leading to poor engine performance. Symptoms include stalling, rough running, and difficulty maintaining idle. A flooded float bowl is a frequent cause, typically resulting from a faulty float needle or clogged jet. Dirt and debris in the carburetor can also disrupt fuel flow, causing misfires and sputtering. Old or stale fuel may contribute to these problems, as it can degrade and leave residues. Cleaning the carburetor and replacing worn components, such as the float needle, can resolve many of these issues. Ensuring proper fuel quality and regular maintenance can prevent future problems. Addressing these issues promptly is essential for reliable operation.
Fuel Line Leaks and Contamination
Fuel line leaks and contamination are common issues that can significantly affect the performance of your Kawasaki Mule. Leaks often occur due to cracked or damaged fuel lines, which can be caused by debris, age, or excessive heat. Contamination, on the other hand, typically results from dirty fuel or moisture in the system. To address these problems, inspect the fuel lines for cracks or damage and replace them if necessary. Use a fuel filter to prevent contaminants from entering the engine. If contamination is suspected, drain the fuel tank and flush the system with clean fuel. Regularly checking and maintaining the fuel system can prevent these issues from arising. Always use high-quality fuel to minimize the risk of contamination and ensure smooth operation.
Cooling System Issues
Overheating and radiator issues are common in Kawasaki Mules. Coolant leaks and corrosion can lead to engine damage. Regular checks and proper maintenance are essential.
Overheating and Radiator Problems
Overheating is a common issue in Kawasaki Mules, often linked to radiator problems or coolant system failures. A faulty thermostat, clogged radiator, or damaged water pump can cause temperature spikes. Drivers may notice the engine overheating during heavy use or in hot climates. Inspecting the coolant level and checking for leaks are essential first steps. A malfunctioning radiator fan or blocked hoses can also contribute to overheating. Cleaning the radiator fins and replacing worn-out components can help resolve the issue. Regular coolant flushes and inspections are crucial to prevent overheating. Addressing these problems early prevents costly engine damage and ensures reliable performance. Always refer to the Kawasaki Mule service manual for specific guidance.
Coolant Leaks and Corrosion
Coolant leaks and corrosion are common issues in Kawasaki Mule models, often leading to overheating problems. Leaks can occur from degraded hoses, loose connections, or damaged radiator cores. Corrosion in the cooling system can cause premature wear on components like the water pump and radiator. Symptoms include low coolant levels, engine overheating, and visible green or yellow fluid leaks. Regular inspection of hoses, connections, and the radiator for signs of damage or rust is essential. Replacing worn-out hoses and treating the system for corrosion can prevent costly repairs. Addressing these issues early ensures optimal engine performance and longevity, avoiding potential damage to critical components.
Brake System Problems
Brake system issues in Kawasaki Mules often involve fluid leaks, low pressure, or worn pads and rotors. These problems can lead to reduced stopping power and safety risks. Regular inspection and timely replacement of components are crucial for maintaining reliable braking performance.
Brake Fluid Leaks and Low Pressure
Brake fluid leaks and low pressure are critical issues that can compromise safety and performance. Leaks often occur at the master cylinder, brake lines, or calipers, leading to a spongy brake pedal and reduced stopping power. Low pressure may also result from air in the system or worn brake components. Inspect the brake fluid level regularly and look for signs of leakage around connections or hoses. If the brake light illuminates or the pedal feels soft, address the issue promptly. Bleeding the brakes or replacing damaged lines may resolve low pressure problems. Always maintain the recommended brake fluid level and consult a professional if issues persist, as brake system failures can lead to accidents. Regular inspections are essential for safe operation.
Worn Brake Pads and Rotors
Worn brake pads and rotors are common issues in the Kawasaki Mule, leading to reduced braking efficiency and safety risks. Symptoms include squeaking noises, spongy brake pedals, and vibrations during braking. Over time, worn pads can damage the rotors, causing them to warp or develop uneven surfaces. Regular inspection of brake components is crucial to prevent such damage. Replacing worn pads early can avoid costly rotor repairs. Additionally, ensuring proper alignment and lubrication of brake components helps maintain even wear and optimal braking performance. Addressing these issues promptly is essential for maintaining the Mule’s reliability and safety on the road or trail.
Suspension and Steering Issues
Uneven tire wear and alignment problems are common, often caused by worn ball joints or bushings. Steering play and loose components can lead to handling issues.
Uneven Tire Wear and Alignment Problems
Uneven tire wear and alignment issues are common in the Kawasaki Mule, often caused by improper tire pressure, worn suspension components, or misaligned wheels. Signs include vibration while driving, uneven tread wear patterns, or the vehicle pulling to one side. These problems can lead to reduced traction, poor handling, and increased risk of tire failure. Regular tire inspections and alignment checks are essential to maintain stability and safety. If uneven wear is detected, check for worn ball joints, tie rods, or shocks, and ensure proper tire pressure. Addressing these issues promptly can prevent further damage and improve overall performance. Proper alignment and maintenance are critical for extending the life of your Mule’s tires and suspension system.
Steering Play and Loose Components
Steering play and loose components are common issues in the Kawasaki Mule, often caused by wear and tear on the steering rack, tie rods, or ball joints. Over time, these parts can become worn, leading to a loose or wobbly steering feel. This can significantly affect handling, especially when towing or carrying heavy loads. If left unaddressed, it may result in reduced control and safety risks. Regular inspections of the steering system are crucial to identify and tighten or replace worn components. Proper maintenance, such as greasing joints and ensuring all bolts are torqued to specifications, can prevent these issues from arising; Addressing steering play promptly ensures a smoother and safer ride.
Maintenance and Repair Tips
Regular servicing and proactive checks prevent major issues. Addressing common faults early saves time and money. DIY repairs can be cost-effective with the right tools and knowledge.
Regular Service Intervals and Checks
Regular maintenance is essential to prevent issues and ensure the Kawasaki Mule runs smoothly. Follow the recommended service intervals outlined in the owner’s manual. Check engine oil, coolant, and brake fluid levels regularly. Inspect the air filter for cleanliness and replace it as needed. Ensure the battery terminals are clean and secure. Lubricate moving parts and inspect belts and hoses for signs of wear. Schedule annual servicing for the fuel system, including fuel filter replacements and throttle body cleaning. Addressing these checks proactively can prevent costly repairs and keep your Mule in optimal condition.
DIY Repairs and Cost-Effective Solutions
DIY repairs can save time and money while maintaining your Kawasaki Mule’s performance. Simple fixes like cleaning the throttle body, replacing air filters, and checking spark plugs can resolve many issues. For fuel system problems, inspecting and cleaning the carburetor or fuel injectors can often restore proper function. Replacing worn brake pads or adjusting the parking brake are also manageable tasks. Always use genuine Kawasaki parts or high-quality alternatives to ensure reliability. Regularly reviewing the service manual and consulting online forums can provide valuable insights and step-by-step guides. By tackling minor repairs yourself, you can extend the life of your Mule and avoid costly mechanic visits.
The Kawasaki Mule is a durable vehicle, but issues like the DFI light and fuel system problems can arise. Regular maintenance and troubleshooting ensure longevity and reliability, making it a valuable work companion.
Final Thoughts on Troubleshooting
Troubleshooting your Kawasaki Mule requires patience, the right tools, and a systematic approach. By addressing issues like the DFI light, throttle body buildup, and fuel system problems, you can restore performance. Regular maintenance, such as cleaning sensors and checking fuel lines, prevents many common issues. DIY repairs and cost-effective solutions can save time and money. Always refer to your repair manual for specific guidance. With persistence and the right knowledge, you can keep your Mule running smoothly for years. Remember, a well-maintained vehicle is not only reliable but also safer to operate. Happy troubleshooting!
Resources for Further Assistance
For deeper insights into Kawasaki Mule troubleshooting, several resources are available. Online forums like Kawasaki Mule forums and ATV repair communities offer real-world experiences and solutions. The Kawasaki Mule service manual provides detailed diagnostic procedures and repair guidelines. Additionally, Kawasaki’s official website offers troubleshooting guides and parts catalogs. Videos on platforms like YouTube demonstrate step-by-step repairs, while specialty tools and diagnostic equipment can be sourced from aftermarket suppliers. For complex issues, consulting a certified Kawasaki mechanic is recommended. These resources empower owners to address problems effectively, ensuring their Mule runs smoothly for years to come.